A spate of failures of Samsung 850PRO SSD drives at a client’s site was the inspiration for this post. The SSD’s were used to boot the OS and were in a RAID 1 mirror when the second SSD had failed.
Replacing the Samsung SSD would have been easy as its a hardware Raid, but the client wanted to use a quicker/more reliable Intel SSD, there were two issues that were critical.
- The new Intel SSD was slightly smaller by 13G so the RAID controller would not just accept it and rebuild the mirror and
- The original Samsung SSD was a single LVM Physical Volume (except for a 2G /boot partition) with no free space.
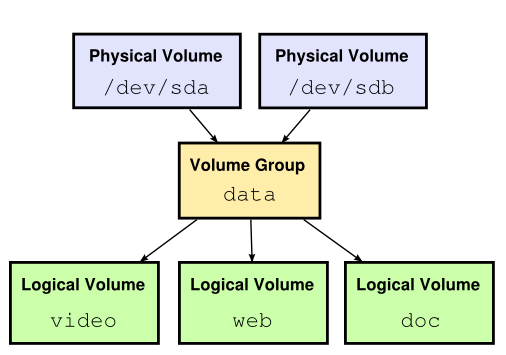
The first step needed was to reduce the size of the file systems so there was some free space in the Volume Group. The Physical Volume (PV) consisted of a single Volume Group (VG) and in the VG held four (5) Logical Volumes (LV). The original Operating System installation process automatically used all of the available disk leaving no free space.
Step 1 required me to resize each Linux ext4 file system (except for the “/” root file system) to the smallest size possible. Luckily I was able to un-mount each filesystem, run an fschk and resize2fs and then resize the logical volume they each sat in (using lvreduce). This yielded 33G of free space in the Volume Group they all resided in.
# vgs
 VG #PV #LV #SN Attr VSize VFree
 vg_os 1 5 0 wz--n- 235.87g 33.43g
#
I next rebooted the server into a GPARTED ISO image thinking I could just do a resize of the PV by 20G but I was not able to get it to display the desktop screen on the Dell R620, so instead I booted an Ubuntu Desktop Live CD as they have GParted installed.
My first attempt to resize the PV smaller resulted in an error message similar to:
/dev/sda2: cannot resize to xxxxx extents as later ones are allocated.It appears that some Physical Extents in the Volume Group still remained at the end of the disk despite the PV showing as 33G free at the end. A quick Google found numerous similar experiences but one page yielded a perfect solution. First you need to see what Physical Extents are allocated, from the root prompt, you can safely run:
pvs -v --segments /dev/your_device_here
Then use the pvmove command to migrate them from the end of the disk. The beauty of pvmove is its work nicely on a live system, as it makes a mirror of the extent before switching access to the new copy so its very cautious and safe to use. The command looks similar to:
pvmove -i5 --alloc anywhere /dev/device:sssss-eeeee
Where “sssss” is the starting segment and “eeeee” is the ending segment reported in the pvs -v command. The “-i5” just reports every 5 seconds so you can see it make its way to 100% completed.
Once the pvmove completed, I rebooted the Ubuntu Desktop ISO and used GParted again, freeing up 20G with no issues.
To check the partitions, I rebooted my original image and the server came up fine reporting 20G less (11.39G free).
# vgs
 VG #PV #LV #SN Attr VSize VFree
 vg_os 1 5 0 wz--n- 214.17g 11.39g
#
Next, I shutdown the server and removed the faulty Samsung SSD, then installed the Intel SSD in its place.
I then mounted the clonezilla ISO and booted into it, selected “device to device” and using “expert mode” to skip checking the target disk size. Once started, Clonezilla copied the entire SSD to the new smaller one and reported no errors. I then rebooted into the controller card and set the new disk as the boot disk.
Needless to say the new disk booted fine and I can now go to the next step of changing the Intel SSD to RAID 1 and then install another one to begin the mirror process.
-oOo-